You would use the Standard Text Area only if you are NOT using the Page Builder however the Standard Text Area and the Text Area in the Page Builder use the same set of WYSIWYG tools so it’s important to know what they do. Most are obvious as they are similar to those in MS Word. Also both can be viewed in Visual or Text mode.
VISUAL verses TEXT mode
There are two views you can work in – Visual and Text (you can alternate between these at any time). Each is activated via the tab on the top right of the tool bar.
The Visual view shows you an approximation of what your page will look like but not necessarily in the correct fonts. For instance it will show your bolded text and image placement.
The Text view will show you the page in HTML format with a limited toolbar. In HTML you will not see Bold or the images but simply the code that references those attributes.
If you enter some text in Visual and make it BOLD then toggle to Text view you will be able to see the html tags wrapping the text. For instance in Visual mode BOLD will look like this whereas in Text mode <strong>BOLD</strong> will look like this.
If you ever have issues with your styling this is a good way to see what’s going on and trouble shoot.
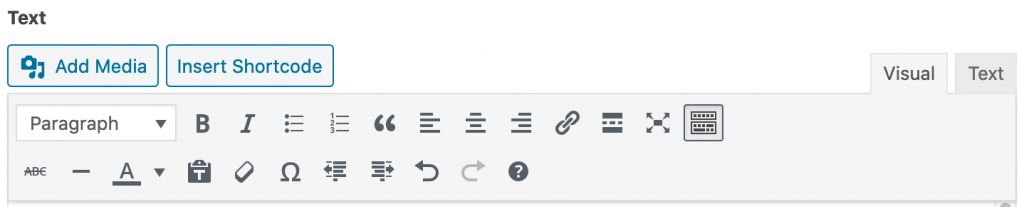
Let’s have a look at the WYSIWYG toolbar
When in Visual mode you can apply heading and body styles as you would in MSWord.
And as mentioned if you get into trouble and have a little understanding of html then you can toggle to Text view the text in html.
For basic html text styling reference see here:
You can also add media (images, PDF’s etc.) by clicking the Add Media button or insert Shortcodes to add buttons, icons, dividers etc.
There are two rows of tools as shown in the image above – if you only see one row click the last icon on the bar (known as the kitchen sink_ to show the second row.
These tools are pretty obvious:
![]()
But some of them need explaining so let’s get going:
Link Tool

To add a link you need to highlight some text then click the unbroken chain icon as shown in the figure above. You then need to enter or paste the link (URL) into the field provided – click the blue arrow to save it or click the cog to make extra settings.
For a URL (website address), you must enter http:// before the actual address, for instance: http://www.google.com
If you want to link to another page in your website go to that page in the browser and copy the URL from the browser and paste it into the URL field shown here.
![]()
For an email address, you must enter mailto: before the email address, for instance: mailto:john@citizen.com
For a PDF, you would get the entire link from the media manager area and paste it into the link field.
Full Screen Edit Mode

Click the icon in the figure above to edit your page in full screen. This is useful if you find the rest of the screen distracting.
Remove Formatting

If you are copying text from another document it may contain formatting. This should be removed otherwise your text may display with unexpected results.
To remove the formatting completely click the icon as shown above. Once clicked when you paste your copy into the page it will be free of formatting.

If you have text already typed or pasted into your content area and you wish to remove the formatting, select the text that you wish to remove the formatting from and click the eraser icon.
Custom Characters

Sometimes you will want to enter custom characters, such as a copyright, trademark or currency symbols.
Click the Omega icon (as shown in the figure above) and a pallet of custom characters is shown. Click to select.
Insert an Image into a Text Area
There are many ways of placing images or other media onto your (website, galleries, featured images etc) but you can also put images in amongst your text within a Text Area. You can also use shortcodes to position the images (more in the Shortcodes unit).
To do this position your cursor in the text at the point you want the image to appear.
- Click the Add Media button located just above your tools. Either use an image you have already uploaded by selecting it OR upload a new image.
- Once you have selected your image, select the alignment (left, centre, right) and size (if you wish the image to be inserted at the size you uploaded it then select Full Size).
- Click Insert into page (post) > SAVE and view your page.
- Make any adjustments, Save and view your page to see how it looks.
Using this method you can even add a Gallery to a Text Area. (Don’t confuse this with one of the fabulous Chameleon galleries in the Page Builder)
Insert a simple Gallery into a Text Area


Follow the same steps as you did to insert an image except after you click Insert Media select Create Gallery.
- Select the images you wish to appear in the Gallery the click the Create New Gallery button.
- Save and view the page.
In the above image you will notice Create Audio or Video Playlist – Both these types of media can use a lot of bandwidth so we recommend using a third party host when embedding either – see the section on Adding Video using Shortcodes.
Keyboard Shortcuts

There’s always a quicker way to do something! Click the ? icon to see all of the shortcuts for the WYSIWYG editor.